

Knowing how to use a compass properly is undoubtedly a skill that every outdoorsman should possess. Furthermore, those who enjoy traveling outdoors or exploring new locations can find a compass as one of the most valuable tools to carry. It can help you navigate through challenging routes and unknown areas without a hitch. Hence, to properly guide yourself on the unexplored routes, you need a compass alongside a map.
Parts Of A Compass
Before you head over to the trails for a hike with the compass in your hand, your foremost step would be to identify the bits and bobs of it. In the broader sense, you can’t even call yourself a beginner if you don’t know what parts a compass has and what they are. Certainly, not all compasses have the same features, but we have put together the main components a typical compass usually possesses.
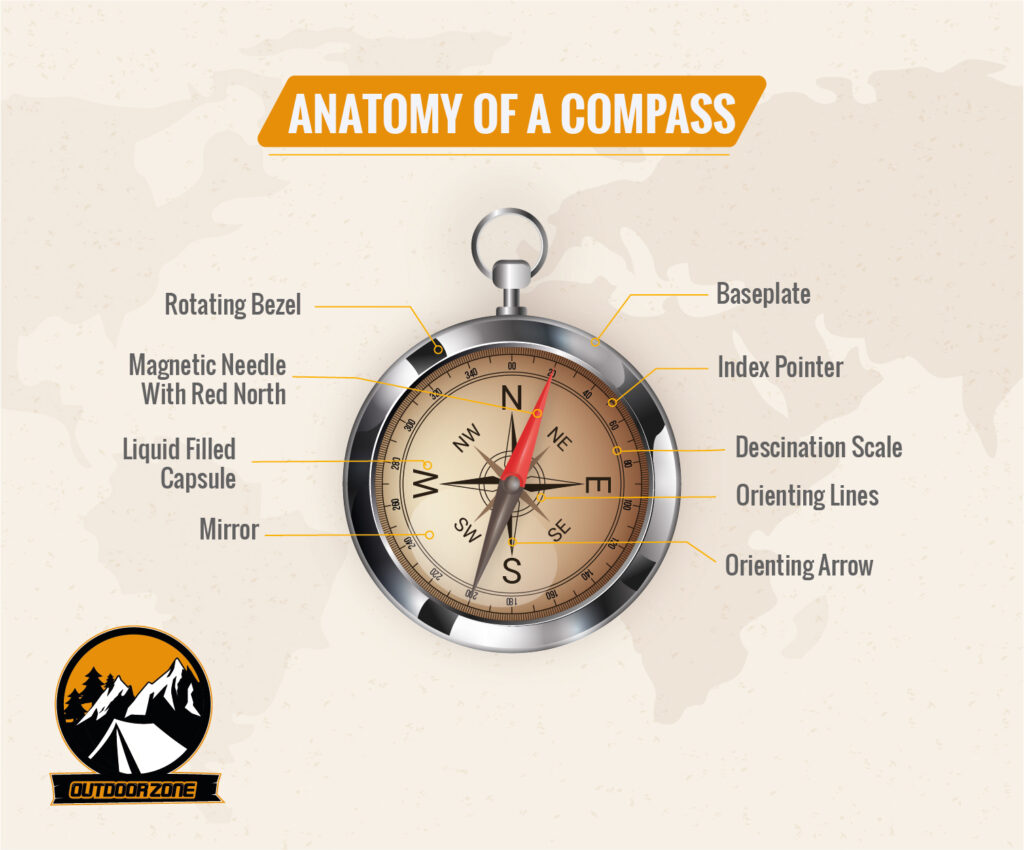
Baseplate
The mounting or the plastic plate that holds the compass is the baseplate. In most cases, the baseplate is flat, transparent, and comes with at least one straight edge for retrieving bearings. Most importantly, the baseplate is constructed of clear acrylic, making it easy for travelers to examine the map underneath it.
Rulers
Several markings run through the edges of the baseplate. These markings, known as “rulers” or “scales” help you measure distances on the map.
Rotating Bezel
Dial, rotating bezel, bezel ring, azimuth ring, or whatever you call it; has the same purpose. The rotating bezel includes markings of four cardinal directions alongside the 360 degrees. These markings help you set the bearings accurately for easy navigation.
Index Line
Often a red line is marked on the baseplate just above the bezel, which is known as the Index line. This thick line usually marks and helps you read the bearing on which you plan to travel.
Travel Arrow
A travel arrow on the baseplate displays the direction in which you should travel once you have set up your compass or taken the bearings. On most compasses, this travel arrow exists as the extension of an index line.
Magnifying Glass
Perhaps, not all compasses come with a circular magnifying glass above the rotating bezel. However, it is small but a very handy component for viewing the fine prints and delicate information on the map. Sometimes the index line progresses through the magnifying glass with the travel arrow on top.
Housing
The raised and enclosed portion of the baseplate is the housing where the bezel rotates surrounding it. It holds the orienting lines, orienting arrow, declination scale, and magnetized needle.
- Magnetized Needle
On the interior of the bezel, the first thing that will strike your eye is the arrow-like needle sectioned with two different colors; white (or black) for the south and red for indicating the north. This magnetized needle is set at the center of the bezel. That way, it revolves freely through pointing always pointing toward the magnetic north pole.
- Orienting Arrow
A big arrow with a structure that fits the outline of the magnetized needle is the Orienting arrow. This fixed arrow on the housing basically aligns with the north of the bezel. Hence, alongside the compass bezel, the orienting arrow revolves around it. However, this arrow is adjustable to caliber for magnetic declination.
- Orienting Lines
On either side of the orienting arrow, some parallel lines run through, known as the Orienting lines. This series of parallel lines move with the bezel as they are fixed on the housing. These lines aid in orienting the grid on the map.
- Declination Scale
Most compasses have this declination scale on the housing to help travelers quickly navigate through areas where the true north and magnetic north does not coincide. In fact, in almost every location, the “north” that a compass’s magnetized needle points to always differ by several degrees from the True North. To resolve this difference for precise navigation, a declination scale is very important.
How To Use The Compass Properly To Navigate?
However, knowing what a compass can do and using it properly are two separate topics. Because you could end up far off your destination if you don’t know how to do some basic orienting or setting up the declination. Perhaps, you may ask what declination means! As mentioned before, there always exists a difference between the magnetic north and the true north. And, this difference between the two is known as the magnetic declination. Hence, setting declination is essential before you start navigating.
Setting Declination For Your Region
First, know the declination value of the location you plan to visit. In doing so, navigating an unknown track becomes easy. Hence you need to adjust your compass according to the declination value of that area as it varies from one location to other. The best part is you can find this value from the declination diagram on your map or from the National Oceanic and Atmosphere Administration (NOAA).
But you also need to make sure your map is the updated version if you do not have access to the internet. Once you find out the declination value for your region, move the orienting arrow to line up with the magnetic needle pointing true north. Now you can start using your compass with your map.
Orient Map With The Compass
Position your map in a way that the North is on top with the East falling on your right. After you have calibrated the appropriate declination for your compass, place it on the map such that the grid lines and edges line up with the compass. That way, your travel arrow should point toward the top of your map. Now, keep turning the bezel so that the north marker of the bezel aligns with the index line or the travel arrow.
After you are done matching the map’s north with the bezel’s north, grab the map and compass firmly without tilting. Next, keep turning your entire body while holding the compass until the magnetic needle lines parallelly with the orienting arrow. Now, you are ready to plot a route or take bearings since your map and compass are entirely aligned.
Plot A Course
After you are done orienting your map with the compass, it is a matter of seconds to plot a course. Position the baseplate on your map. Pick one end of the straight edge as your current location (mark it with A) and the other end with the travel arrow as your destination (mark it with B). Then draw a line between these two points and check the map’s scale to know how far is your destination. To find that, you need to multiply the map’s distance by the divider of the scale. Then keep following the direction of the travel arrow to walk towards your destination as long as the needle sits on the orienting arrow.
Conclusion
Before heading into the wilderness, try to hone your compass skills by setting up the declination or by plotting courses to find your destination in a known location. This way, you can use a compass correctly and get acquitted with more techniques. We hope that this guide has helped you to stay prepared for your next outdoor adventure.

William Arrovo seeks thrills and laughter in everything he comes across. He is a fun loving person with a zest of exploring the breathtaking places around the globe. He feels content in sharing his experiences of travelling to various countries. He is grateful about enriching himself with a myriad of cultures and rejuvenating his soul while staying outdoors.


Leave a Comment